Turning on the “Just Scan” feature on your LG TV can significantly enhance your viewing experience by displaying images in their original aspect ratio. This feature uses 1:1 pixel mapping to ensure that the images fit perfectly within the screen’s borders, eliminating any stretching or distortion. However, activating “Just Scan” is not as straightforward as it seems. There are specific settings and technical nuances that you need to be aware of, especially if you’re dealing with different input sources like gaming consoles or laptops.
Here’s a quick how-to guide for turning on “Just Scan”:
- Press the Settings Button: Locate the settings button on your LG TV remote and press it.
- Navigate to Picture Settings: Scroll through the options until you find ‘Picture Settings’ and select it.
- Select Aspect Ratio: Within ‘Picture Settings,’ find and select the ‘Aspect Ratio’ option.
- Choose ‘Just Scan’: From the list of aspect ratios, select ‘Just Scan’ and confirm your choice.
By following these steps, you’ll not only activate the “Just Scan” feature but also optimize your LG TV for a better viewing experience. Whether you’re a tech-savvy individual or a beginner, this guide aims to provide you with a comprehensive yet straightforward roadmap for optimizing your LG TV settings.
What is ‘just scan’ on LG TV
By default, your television is set to display the wrong resolution.
Let me explain it to you.
LG TV has two main display modes, ‘overscan’ and ‘just scan.’ Overscan which in most cases is the default display setting, is a behavior of the screen in which parts of the images appear outside of the visible parts of the screen.
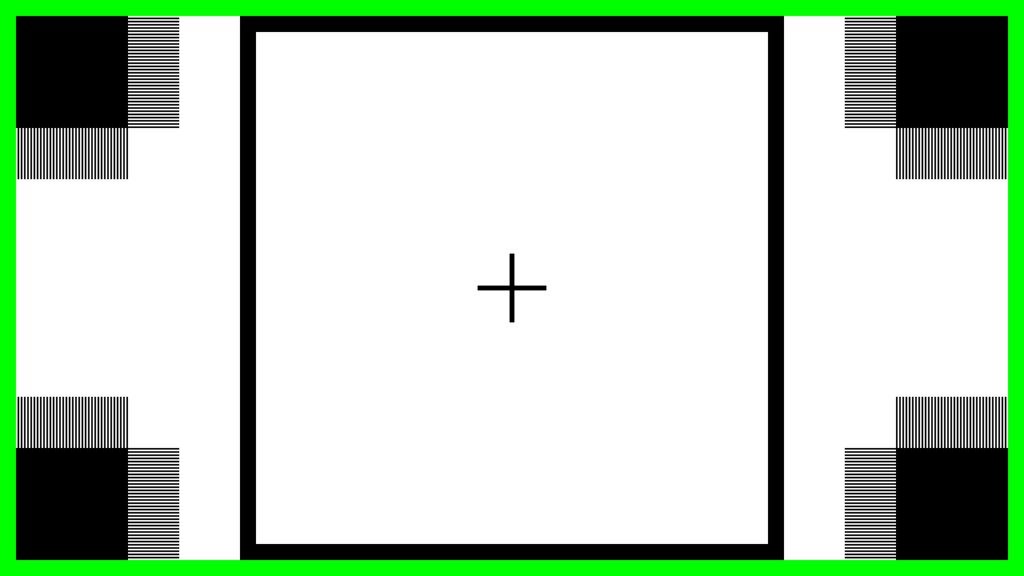
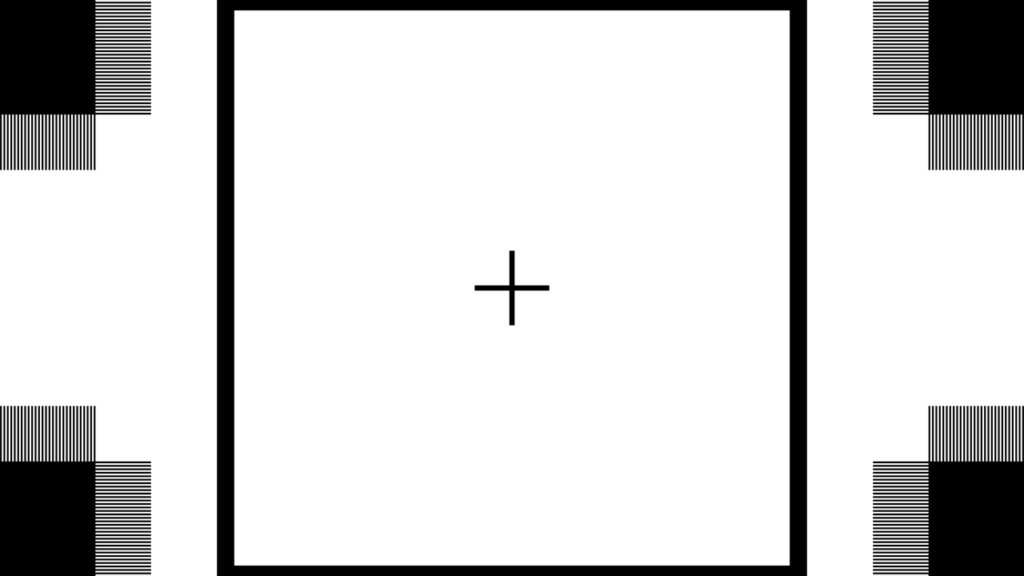
Take a look at the below images,


The green box is no longer visible in the second image, and the squares on the corner adopt a rectangular shape. Unfortunately, there is no standard specification on the amount of images that can be overscanned. Besides, the title safe modes require more margin than the action safe modes, which means that the appearances will differ.
Below is a table showing the BBC’s suggestions on the overscan amount.
| Action safe | Title safe | |||
| Vertical | Horizontal | Vertical | Horizontal | |
| 4:3 | 3.5% | 3.3% | 5.0% | 6.7% |
| 16:9 | 3.5% | 3.5% | 5.0% | 10.0% |
| 14:9 (displayed on 16:9) | 3.5% | 10.0% | 5.0% | 15.0% |
| 4:3 (displayed on 16:9) | 3.5% | 15.0% | 5.0% | 17.5% |
Let’s say it is point blank, the overscan mode not only changes the appearance but may also distort the image. Fortunately, this error can be corrected using the ‘just scan’ mode.
Just scan is a behavior in LG television that uses 1:1 mapping to allow the pictures to be displayed only within the border. Thus, it shows the original image without stretching it, distorting its properties such as resolution.
In other words, ‘just scan’ shows clearer and sharper images which is not something to compromise.
With that said, do you want to have higher-quality pictures while watching your favorite movie? If yes, how do you get your LG TV to ‘just scan?’
LG tv c1 ‘just scan’ on and off process step by step
One of the many reasons the LG brand is quite popular is its excellent user experience. As a result, its settings are pretty straightforward and do not need a nerd to perform. Besides, they are pretty accessible and short.
Consequently, setting your LG TV c1 ‘just scan’ on and OFF is an easy task.
1. Press on the settings button
The settings button displays a screen that allows you to alter the TV’s programming.
Take your remote find a button with the settings icon.
2. Select the picture settings
Pressing the settings icon displays various settings; one is picture settings. Hover over the picture settings tab and then click okay to select.
3. Select picture mode.
Personalizing the appearance of the TV pictures gives more control to your device and ensures that you have the best. Fortunately, LG has made it possible to adjust most if not all picture display characteristics.
Clicking on the picture mode on the picture setting screen displays various settings such as picture reset, brightness, screen, sharpness, color, picture mode, aspect ratio, to mention only a few.
Scroll down on the pop-up screen until you find the aspect ratio tab. Click on it, and let’s move on.
4. Select the appropriate aspect ratio
After hovering or clicking on the aspect ratio tab, the pop-up screen displays various picture ratios. For instance, some LG C1 TV aspect ratios are 16:9, zoom, ‘just scan,’ and 4:3.
The default picture display is 16:9. If you want to turn on the ‘just scan’ mode, simply select its tab and click okay to set it on.
Similarly, if you want to turn it off, select your preferred aspect ratio and click okay.
LG tv cx ‘just scan’ on and off process step by step
The LG TX CX is slightly different from the LG C1 TV. Thus, their process of setting the just scan ratio is almost similar. One thing to note is that the settings icon might not be on the remote in most cases.
1. Navigate to settings
As I said earlier, the settings icon is not on the remote in some cases.
Thus, first, you need to tap open the home icon.
On the home icon, find the settings tab and tap on it
2. Move to the picture mode settings
After tapping on the settings tab, you will be taken to a new display screen that contains several types of settings; one of them is the picture mode. Highlight its tab and click to select.
3. Select the aspect ratio
After clicking, you will see a pop-up screen containing countless picture characteristics. Scroll down and hover on the aspect ratio property.
4. Change the aspect ratio
Hovering over the aspect ratio displays several picture ratios to choose from.
If you want to get ‘just scan’ on your LG TV, select it and click okay to set.
However, if you want to set ‘just scan’ off your LG TV, just select any other aspect ratio and click okay to change.
LG TV OLED just scans on and off process step by step
OLED TV model is the latest from LG, making life better for anyone regularly glued to a screen. Its most significant improvement is in color fidelity and image quality.
LG OLED TV expresses a perfect black, and even better, it has been certified to have achieved 100% color fidelity. In other words, the on-screen image closely matches the original image.
Besides, it uses the self-lit pixel technology that equips it with absolute precision and clarity. Additionally, it adopts an ultra-slim design and combines several other display layers to ensure a high-quality picture.
To add icing to the cake, you can take the resolution of the images higher by setting the just-scan picture aspect ratio on the OLED TV.
How do you set LG TV OLED to this 1:1 mapping aspect ratio?
1. Press the Home button
On the left side of the remote, just above the navigation buttons (back, forward, up, and down buttons), the OLED remote has a button with the home icon.
Click on this icon, and let’s move on.
2. Click on Settings
Clicking on the home icon displays the home screen. Look for the settings tab, select it and click on the current screen.
3. Select the Picture settings
This latest tv model from the LG brand has given the users absolute control. Consequently, it has countless levels of settings.
However, we are only interested in the picture sets in our case. Therefore, find the picture settings tab, and tap on it.
4. Hover on the Aspect ratio picture setting
Scroll down the pop-up screen and hover over the aspect ratio picture property.
5. Set the ‘just scan’ mode ON or OFF
Hovering over the aspect ratio screen displays several picture rations. One of them is ‘just scan.’
To set, ‘just scan’ on, select, and click okay.
On the other hand, please select any different aspect ratio and click okay to set it off.
LG TV just scan greyed out? How to fix
A greyed-out tv not only has an unpleasing appearance but may also prevent you from using the clarity picture options.
If it is your first time encountering it, you might feel hopeless and, worse, start budgeting on a professional consultation.
The good news is that it is not a big problem and can easily be fixed.
Below are some ways how to correct this problem.
Factory reset
Resetting the LG TV can help do away with the greying effect. But be warned! Resetting the tv will affect all other settings; hence we rarely recommend it.
1. Navigate to the home screen
If your remote has a home button, press it to show the home screen.
2. Settings screen
After displaying the home screen, find the settings tab and click it.
On the other hand, if your remote has a settings icon instead of home, press the icon and continue with the next step.
3. Factory reset
On the settings screen, find restore factory reset and click on it. Follow instructions displayed on the screen to reset your tv.
Clarity reset
1. Video control panel
First, find the video control on your tv and click it.
2. G-sync
On the left panel, select the Gsync panel and click
3. Disable G-sync compatibility
After clicking on the g-sync tab, a screen containing g-sync settings is displayed.
If the checkbox labeled ‘Enable g-sync compatibility’ is checked, click on it to uncheck
4. Apply the settings
Click on the apply button and wait for a few seconds for the changes to take effect.
You can also check on this video how to fix the greyed screen.
